.png)
.avif)

Blog
Read more Articles
Keep up to date with medspa marketing strategies.

Patient intake is where most practices bleed the most time. A new patient fills out a form, the front desk re-types it into the CRM, someone re-types it again into the EMR, and the provider still walks into the first visit skimming a printout.
At NexaMed, we build marketing and operations systems exclusively for medspas and cash-based private practices, and this is one of the highest-leverage automations we deploy: a patient completes your intake form once, and within seconds they exist as a contact in GoHighLevel, exist as a patient in Cerbo, and have a SOAP note on their chart pre-filled with everything they just told you. No manual entry anywhere. This guide documents the full build using Cerbo's API documentation and running in production for our clients.
An HTML intake form sends its submission data to an n8n webhook. n8n parses the payload, then creates or updates the contact in GoHighLevel through its API. After a short wait, n8n queries the Cerbo API to check whether that patient already exists in the EMR. If they exist, it captures their Cerbo patient ID. If they don't, it creates the patient, then captures the ID. Finally, it posts a formatted encounter note (your SOAP note) to that patient's chart using the intake data. The patient ID anchors the entire second half of the workflow because it's the one identifier Cerbo treats as universal.
What you'll need:
You're moving protected health information between systems, so you do extend your risk of patient leaks and HIPAA violations.
Your EMR already operates under a Business Associate Agreement. GoHighLevel is different: standard accounts are not HIPAA compliant by default. Compliance is a paid add-on that enables encryption, enforced MFA, audit logging, and a BAA you sign inside the platform. If PHI will touch your CRM, that add-on is not optional if you want to stay compliant. Middleware is the piece most people miss: confirm your middleware vendor will sign a BAA before PHI passes through it, and if they won't, self-host n8n on infrastructure you control.
The other half of compliance is architectural: send the minimum necessary to the CRM. GoHighLevel gets contact details and operationally useful fields for outreach and marketing like, referral source, preferred pharmacy, etc. The clinical narrative belongs in the EMR. That split is both the correct legal posture and what keeps your CRM clean enough for the marketing automation it actually exists for. Two Cerbo-specific rules from their own documentation are worth internalizing now: API credentials are server-side only, never embedded in a public form or client-side code, and API users should carry minimum-necessary permissions. None of this is legal advice — run your setup past your compliance officer.
You want a form you fully control, which means custom HTML rather than a form builder. Have AI write it: describe your questions, and tell it to use clean snake_case name attributes on every input, because those names become your JSON keys downstream.
To test locally, open the project in VS Code, install the Live Server extension, and click "Go Live." Your form runs at a local address instantly. For production, push the project to a GitHub repository, import it into Vercel, and point a subdomain like forms.yourdomain.com at the deployment. Vercel handles hosting and SSL, and the whole process takes minutes.
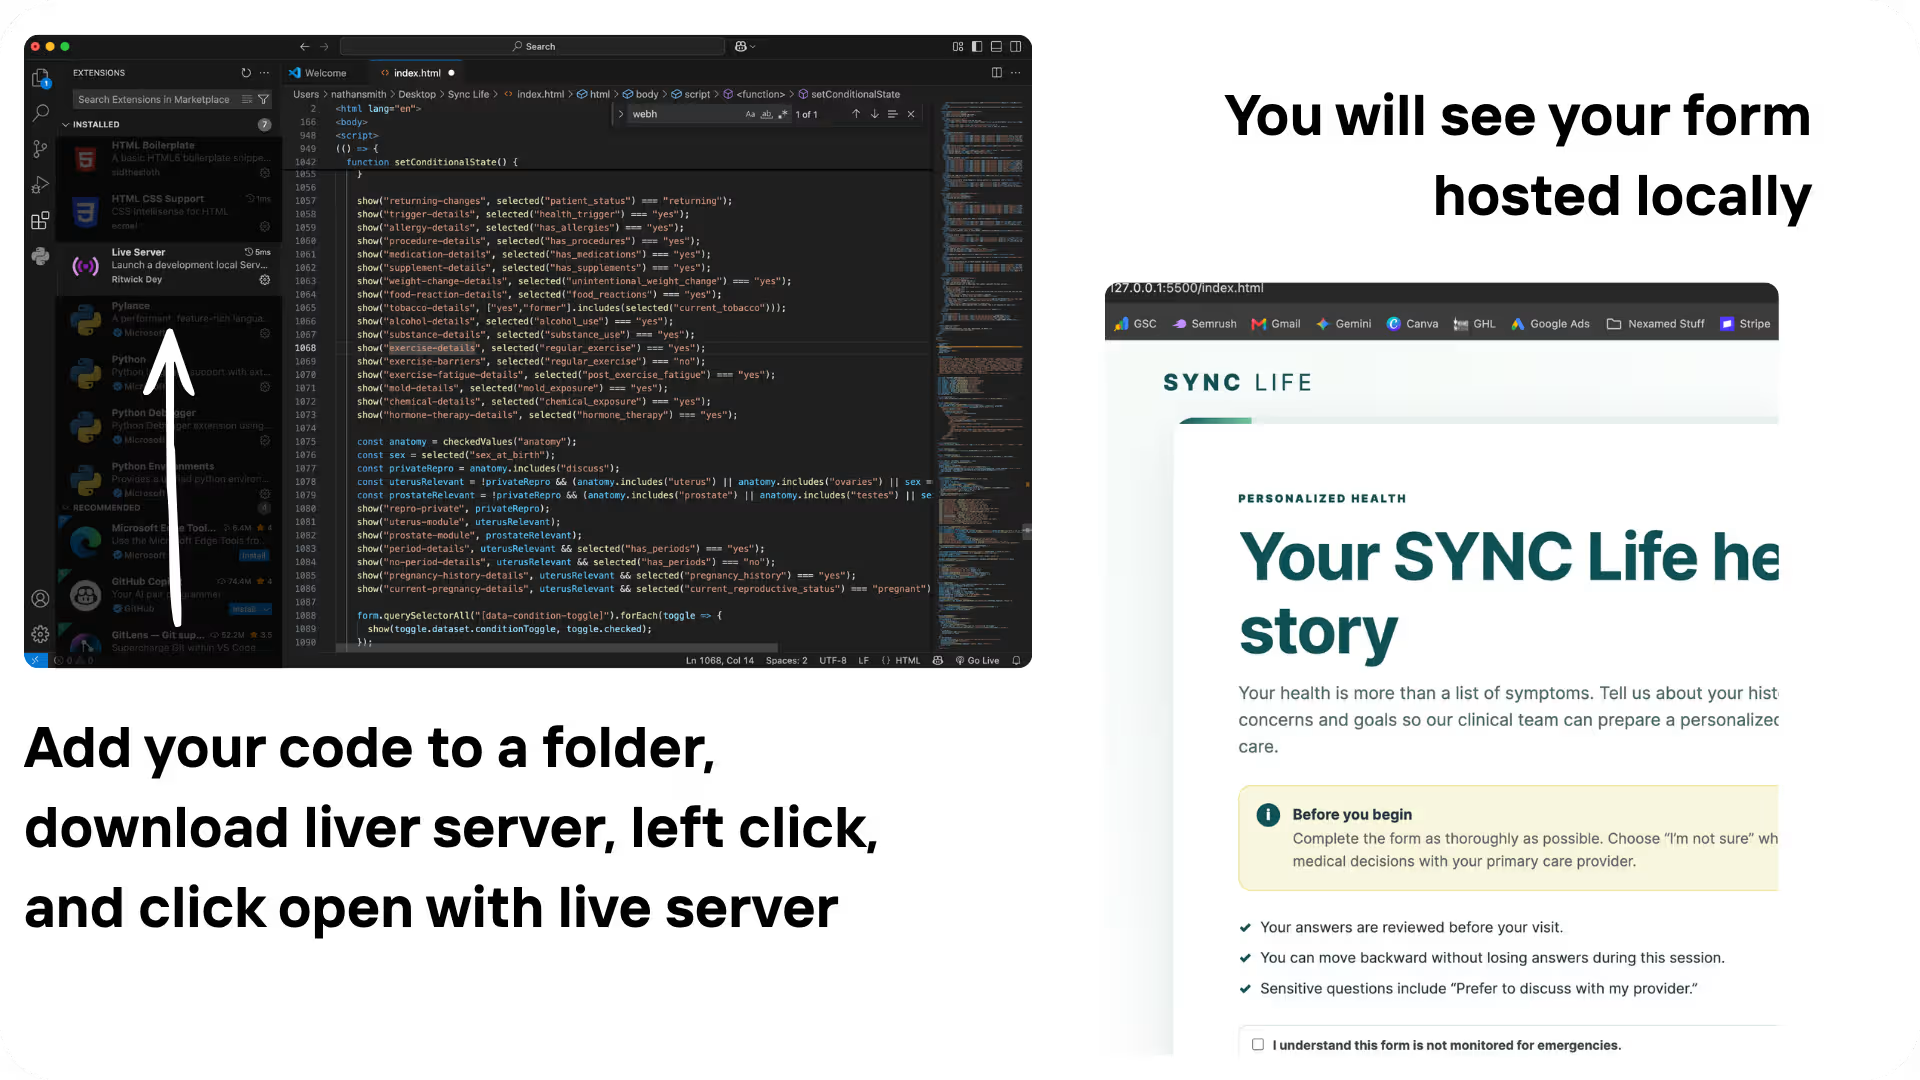
In n8n, create a new workflow and add a Webhook node set to POST. Copy its test URL, then have your form's JavaScript send submissions to it:
<script>
(() => {
"use strict";
const CONFIG = {
logoUrl: "",
submitEndpoint: "https://synclifewebhook.app.n8n.cloud/webhook-test/44r92d1-28ga-4db4-9b5f-6a509d8f3d31",
saveDraftEndpoint: "",
redirectUrl: "",
consentVersion: "2026.07",
debug: false
};
One detail that trips people up: Object.fromEntries keeps only the last value of any repeated field, so if your form uses multi-select checkboxes, collect those with formData.getAll() so every selection comes through.
Click "Listen for test event" in n8n, submit a test entry, and the payload appears in the node's output. Once the whole workflow is verified, swap the test URL for the production URL and activate it.
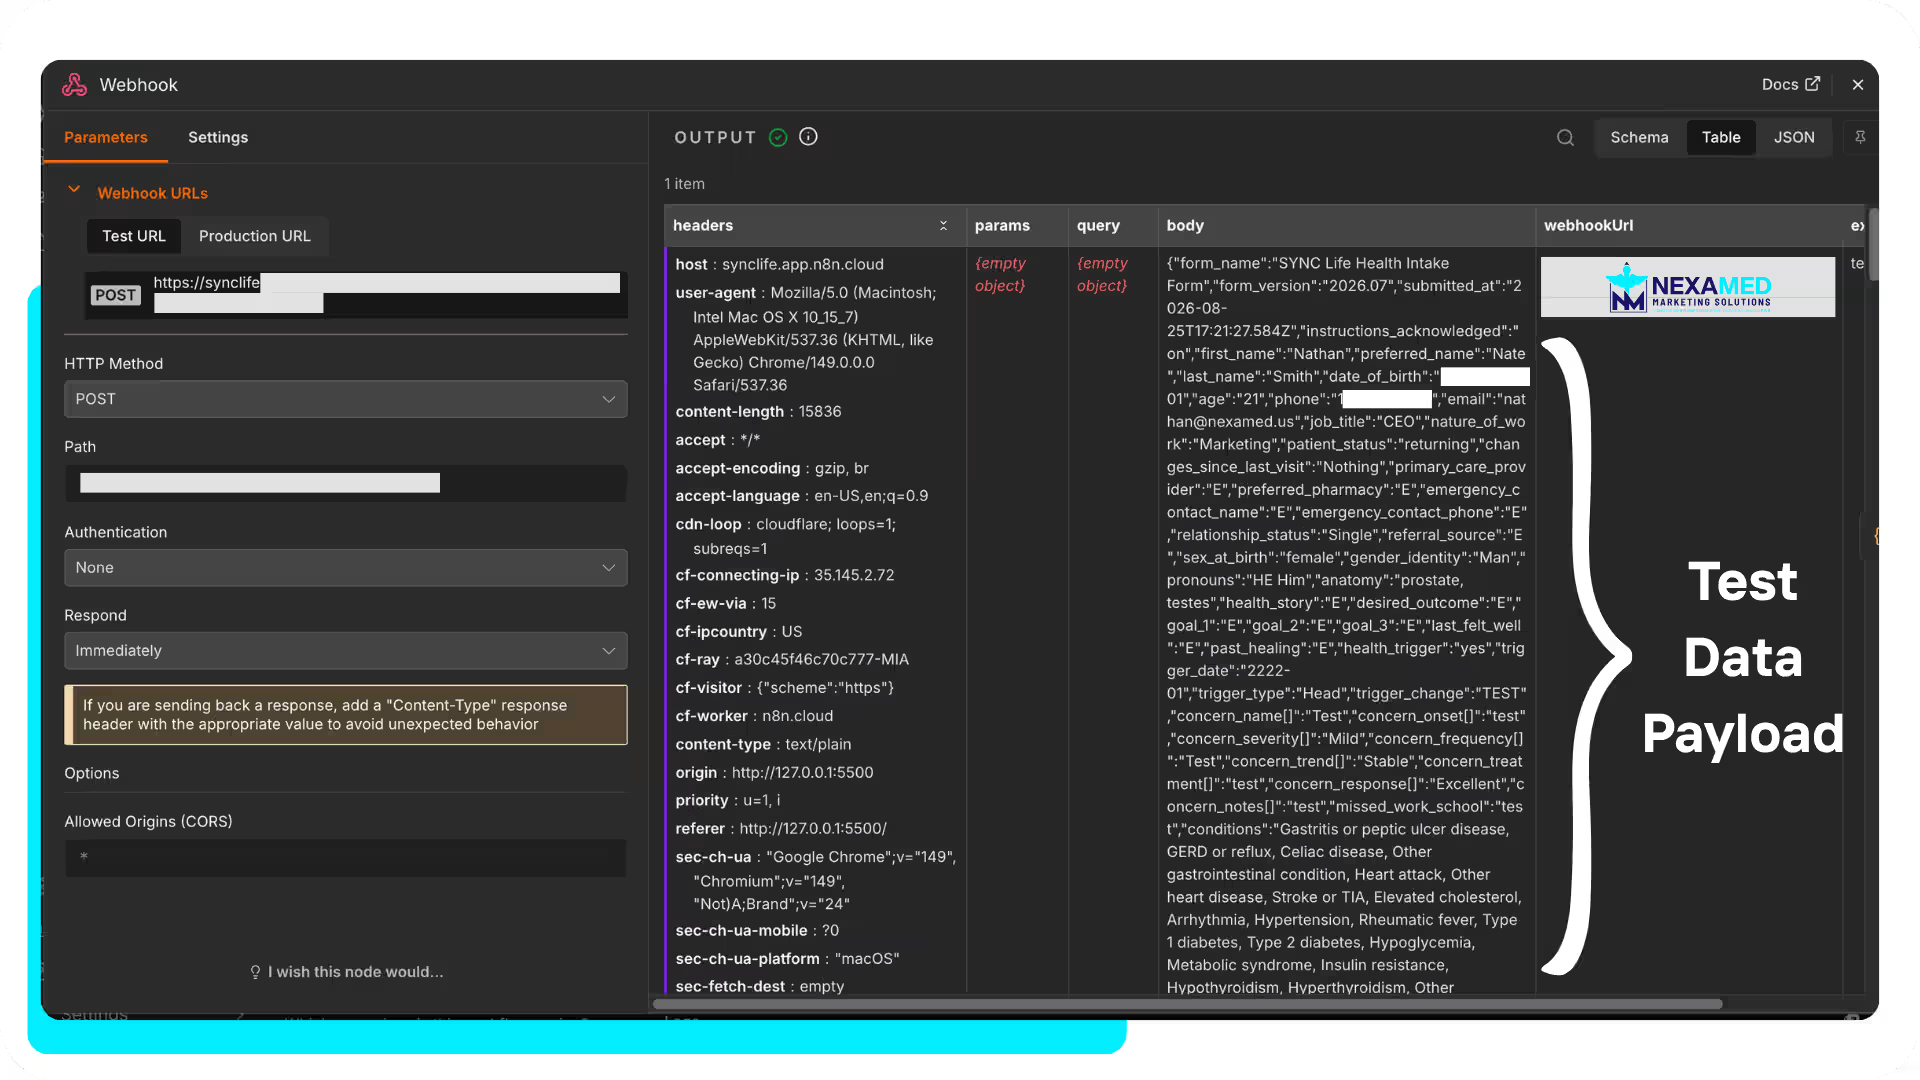
Raw webhook payloads read messy. There are values nested under body, checkbox answers arriving as arrays, stray whitespace, etc. Add a Code node directly after the webhook to flatten everything into clean key-value pairs:
// Parse the stringified JSON body coming from the Webhook node
return {
json: JSON.parse($json.body)
};
Name this node Parse. Every downstream expression in this guide references it as $('Parse'), so the name matters. Run a test submission and confirm each form question now appears as its own tidy field.
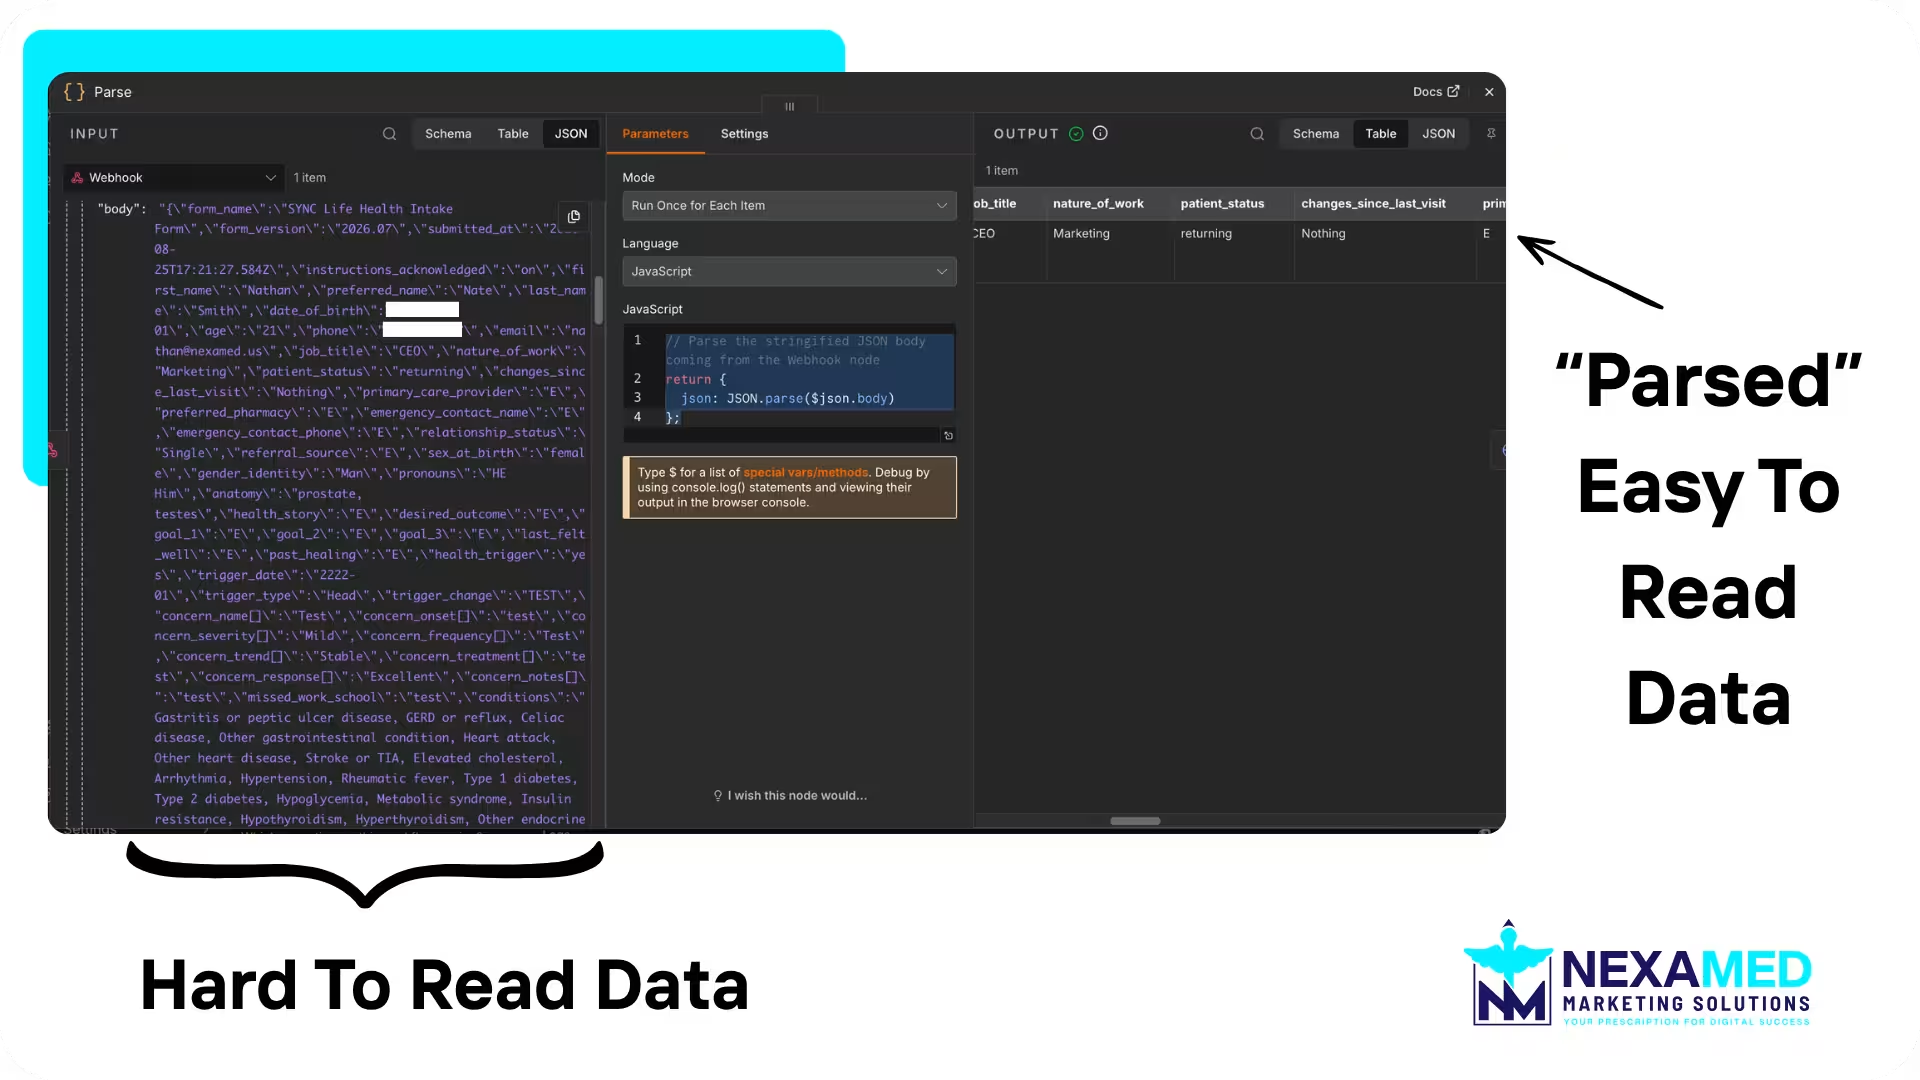
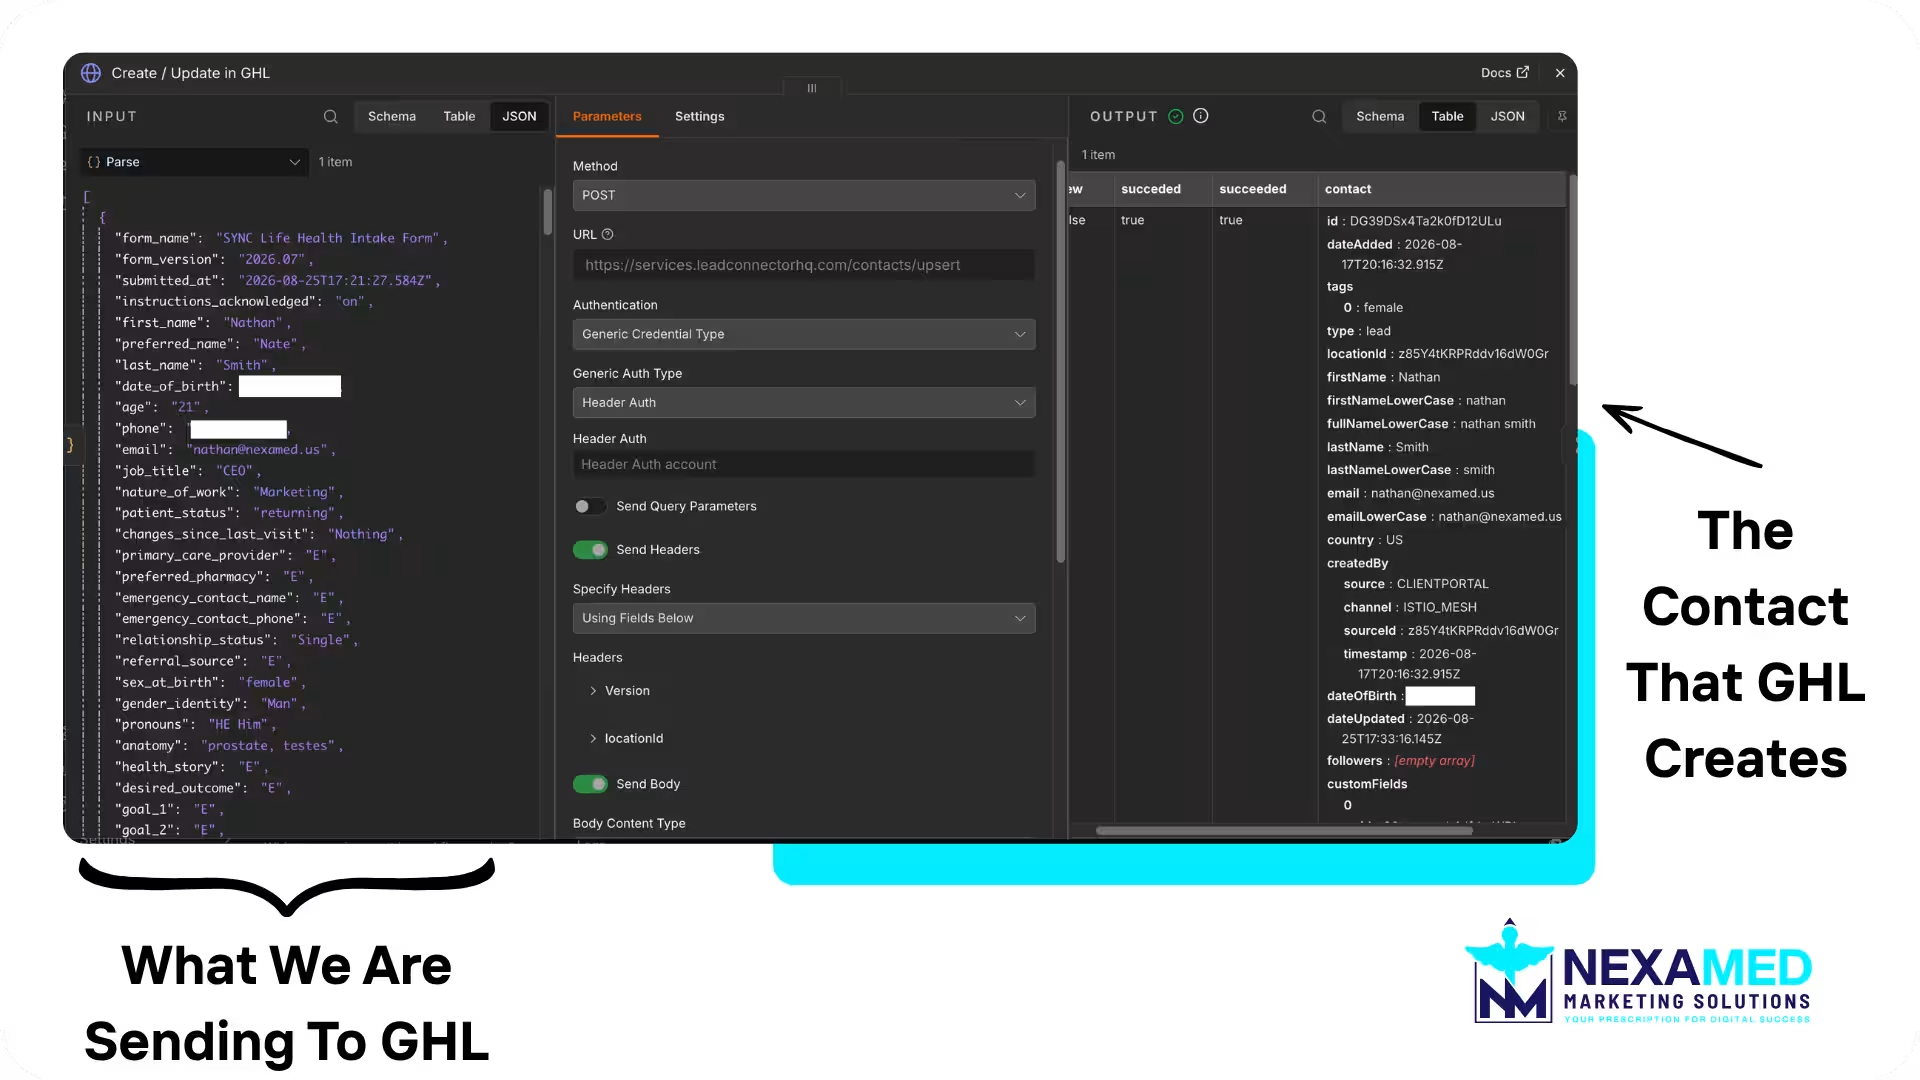
GoHighLevel's current API (v2) authenticates with a Private Integration token — a static key scoped to one sub-account.
You also need two identifiers: your Location ID (Settings → Business Profile) and the custom field ID for every intake question you're storing (Settings → Custom Fields — each field has a unique ID). Add both to your field map.
Add an HTTP Request node after Parse:
Use the upsert endpoint rather than plain create so repeat submissions update the existing contact instead of duplicating it. The body maps standard fields directly and custom fields by ID:
{
"firstName": "{{ $json.first_name }}",
"lastName": "{{ $json.last_name }}",
"email": "{{ $json.email }}",
"phone": "{{ $json.phone }}",
"dateOfBirth": "{{ $json.date_of_birth }}",
"locationId": "YOUR_LOCATION_ID",
"customFields": [
{ "id": "CUSTOM_FIELD_ID_1", "field_value": "{{ $json.referral_source }}" },
{ "id": "CUSTOM_FIELD_ID_2", "field_value": "{{ $json.desired_outcome }}" }
]
}
Add one object per custom field from your map. This is another payload worth having AI generate from that map rather than hand-typing thirty entries. Run a test, look for the green check on the node, then open GoHighLevel and confirm the contact exists with every field populated.
Add a Wait node set to five seconds. It gives the upsert time to settle and gives the rest of the workflow a stable reference point — later nodes can pull the confirmed contact object with $('Wait').item.json.contact whenever you need it.
Cerbo's API lives at https://yourpractice.md-hq.com/api/v1/, where the subdomain matches your EMR login URL. Access isn't self-serve: you request API credentials from Cerbo, and they issue an API username and secret key (a keypair entirely separate from any EHR login.) When you request them, specify what the integration needs: read and write on patients, write on encounters. Cerbo's own best practices call for minimum-necessary permissions, and a properly scoped key that works beats a full-access key you'll have to justify in an audit. Request a sandbox environment at the same time — Cerbo provides them for development, and your first hundred test submissions should hit fake charts, not production.
In n8n, create a Basic Auth credential: username is the API username, password is the secret key.
Add an HTTP Request node after the wait:
Email matches against the patient's primary or secondary address, and adding date of birth protects you from shared family emails matching the wrong chart. The response is a list object with a total_count and a data array: zero means no match, one or more means the patient exists — and each returned record includes the field the whole workflow revolves around, the Cerbo patient ID.
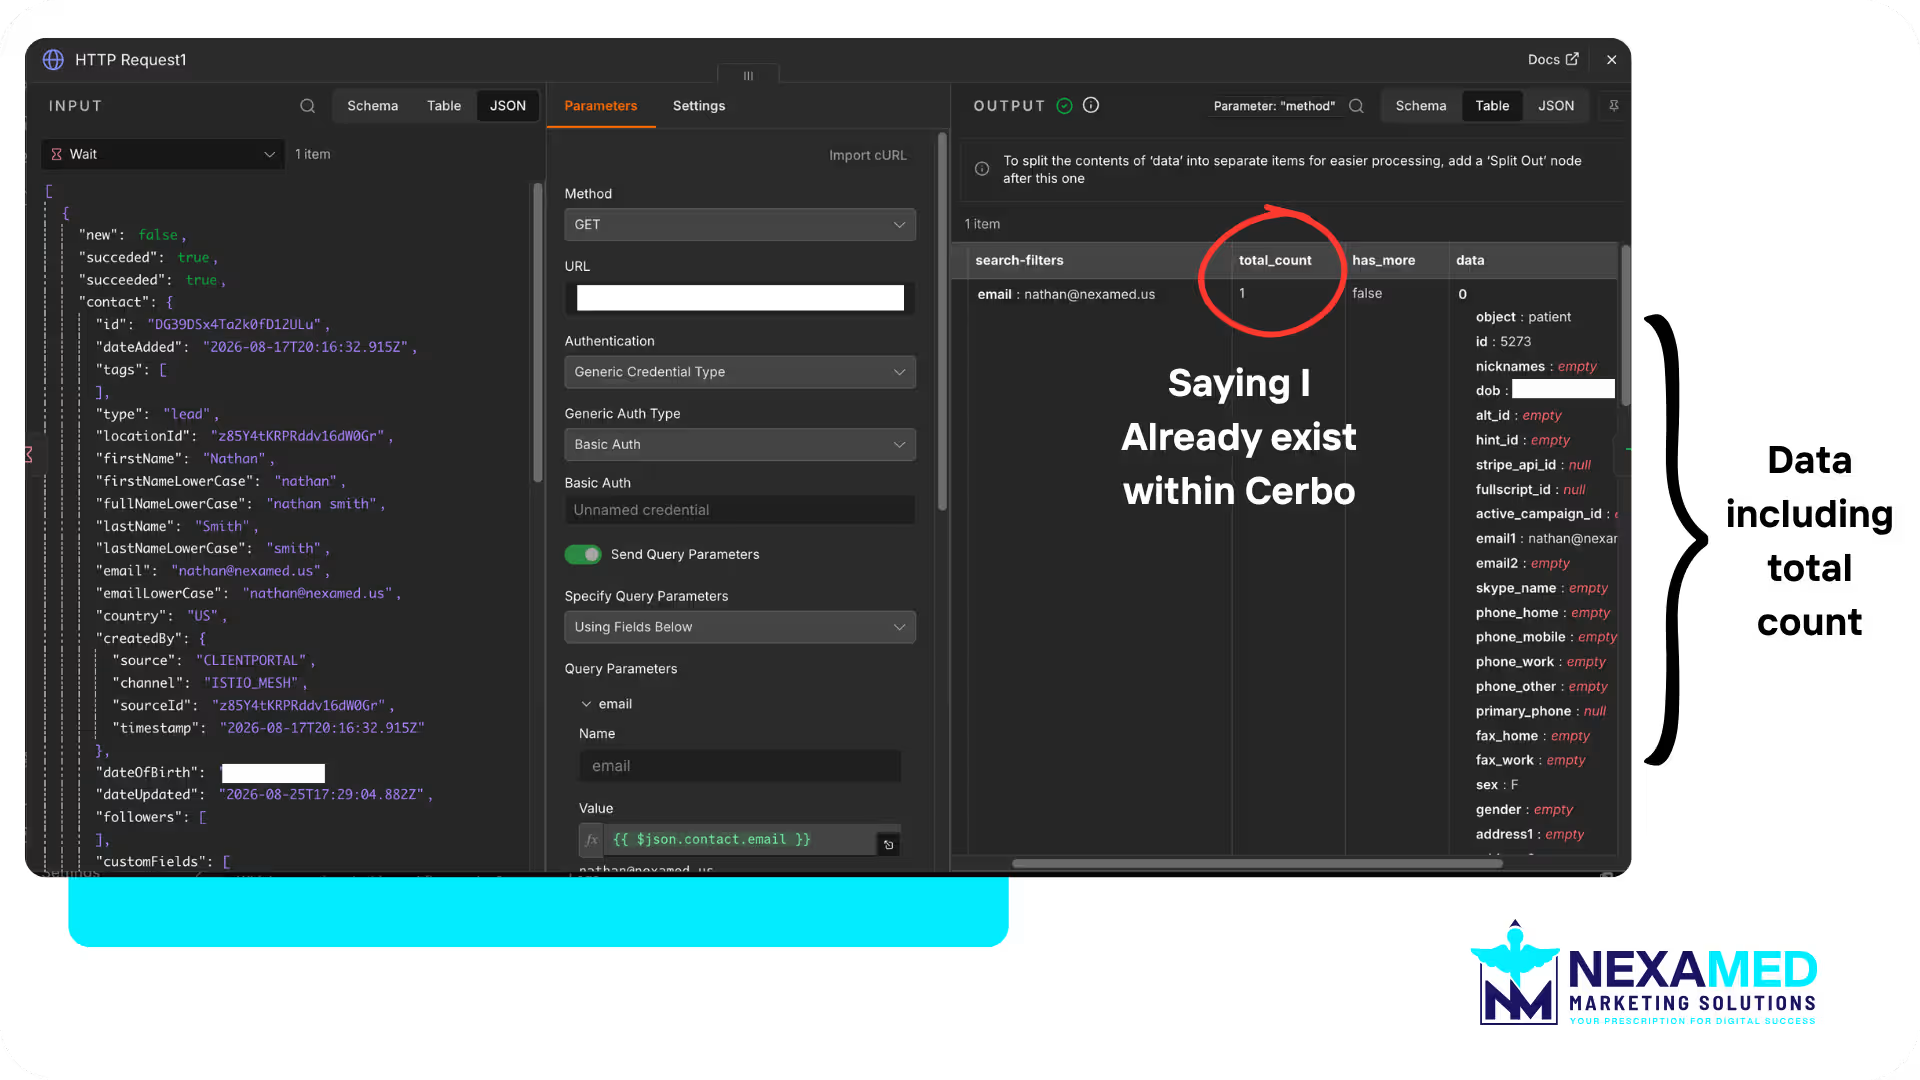
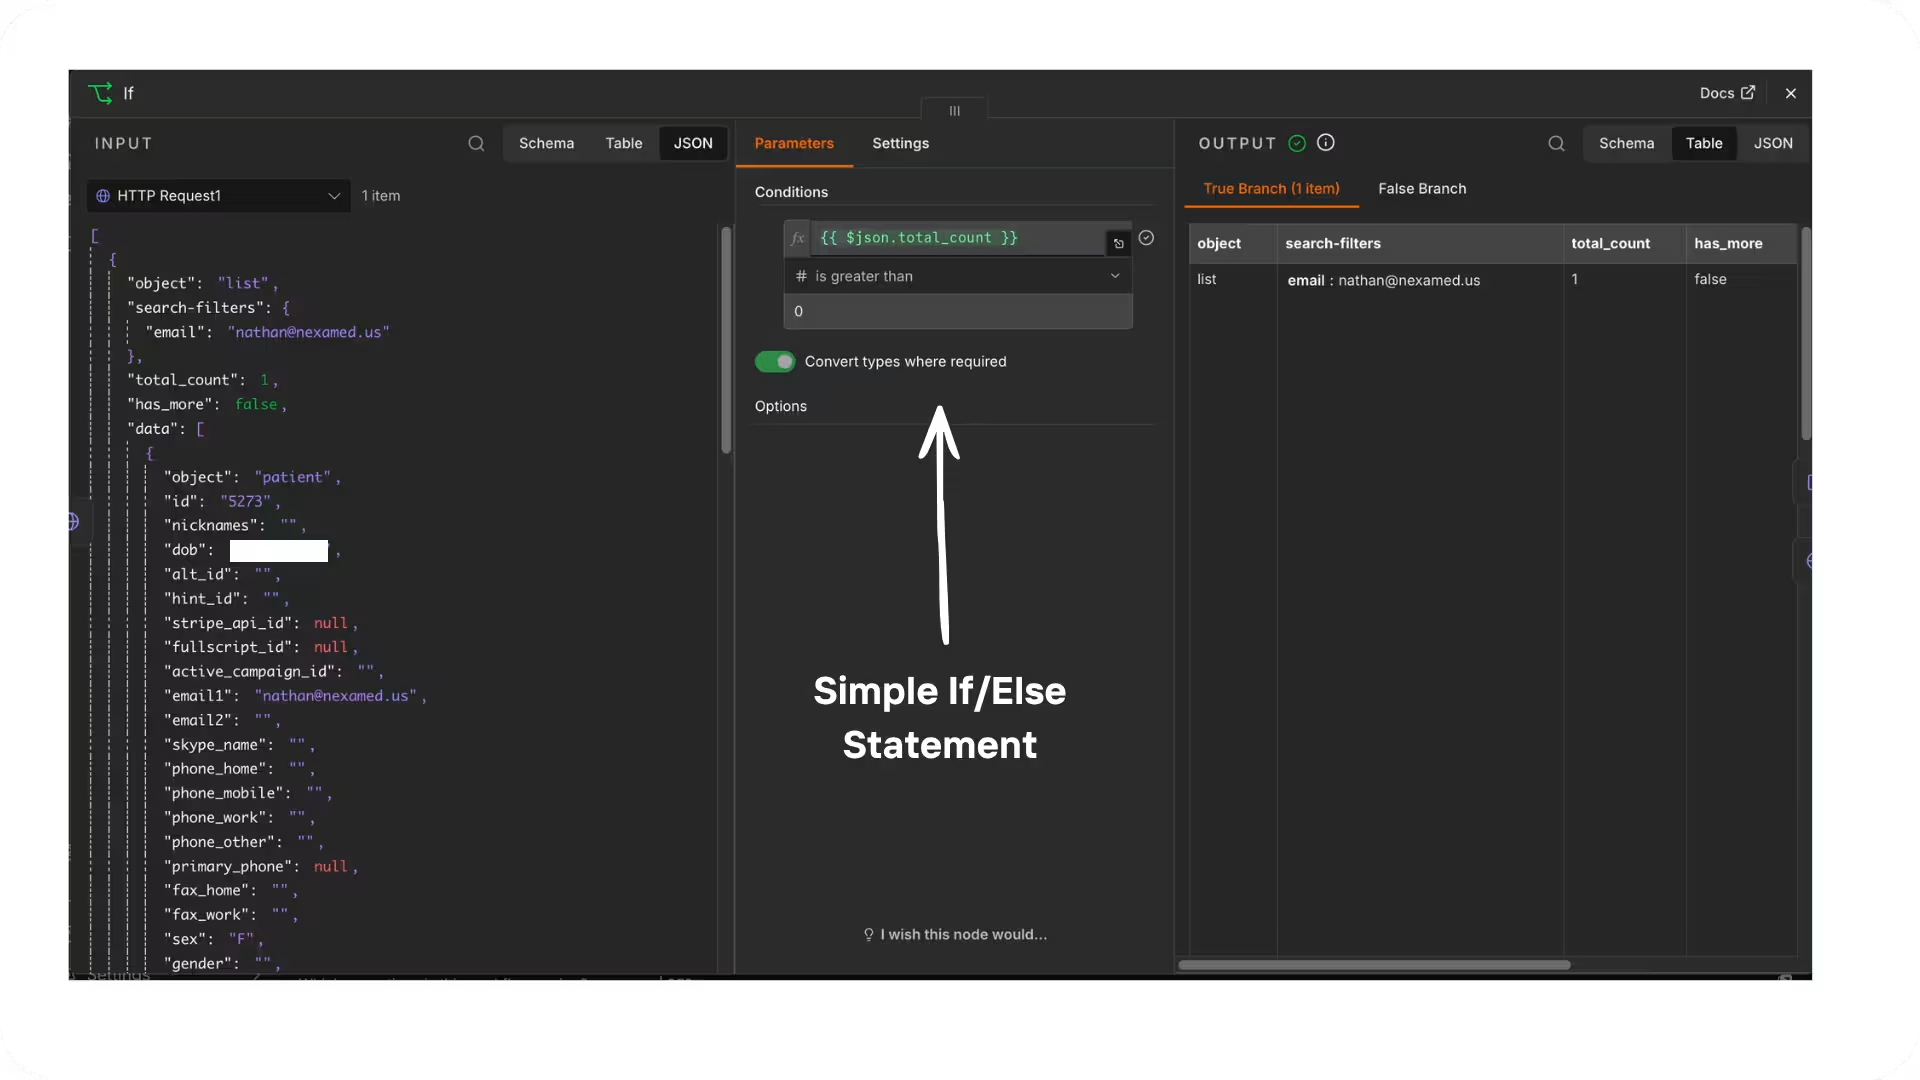
Add an IF node with a number condition: {{ $json.total_count }} is greater than 0.
True means the patient exists — capture the ID from the first result ({{ $json.data[0].id }}) and skip ahead to Step 9. False means new patient — continue to Step 8.
Add an HTTP Request node on the false branch:
Cerbo requires four fields at minimum: first name, last name, date of birth in YYYY-MM-DD, and sex — which must be exactly M, F, or ?.
{
"first_name": "{{ $('Parse').item.json.first_name }}",
"last_name": "{{ $('Parse').item.json.last_name }}",
"dob": "{{ $('Parse').item.json.date_of_birth }}",
"sex": "{{ $('Parse').item.json.sex_at_birth === 'Male' ? 'M' : $('Parse').item.json.sex_at_birth === 'Female' ? 'F' : '?' }}",
"email1": "{{ $('Parse').item.json.email }}",
"phone": "{{ $('Parse').item.json.phone }}"
}
Note the ternary on sex: Cerbo rejects anything outside its three accepted values, so map your form's wording explicitly and let ? catch everything else. The creation response returns the new patient record with its ID. If you want a belt-and-suspenders approach, add a short wait and re-run the Step 6 search to pull the ID fresh.
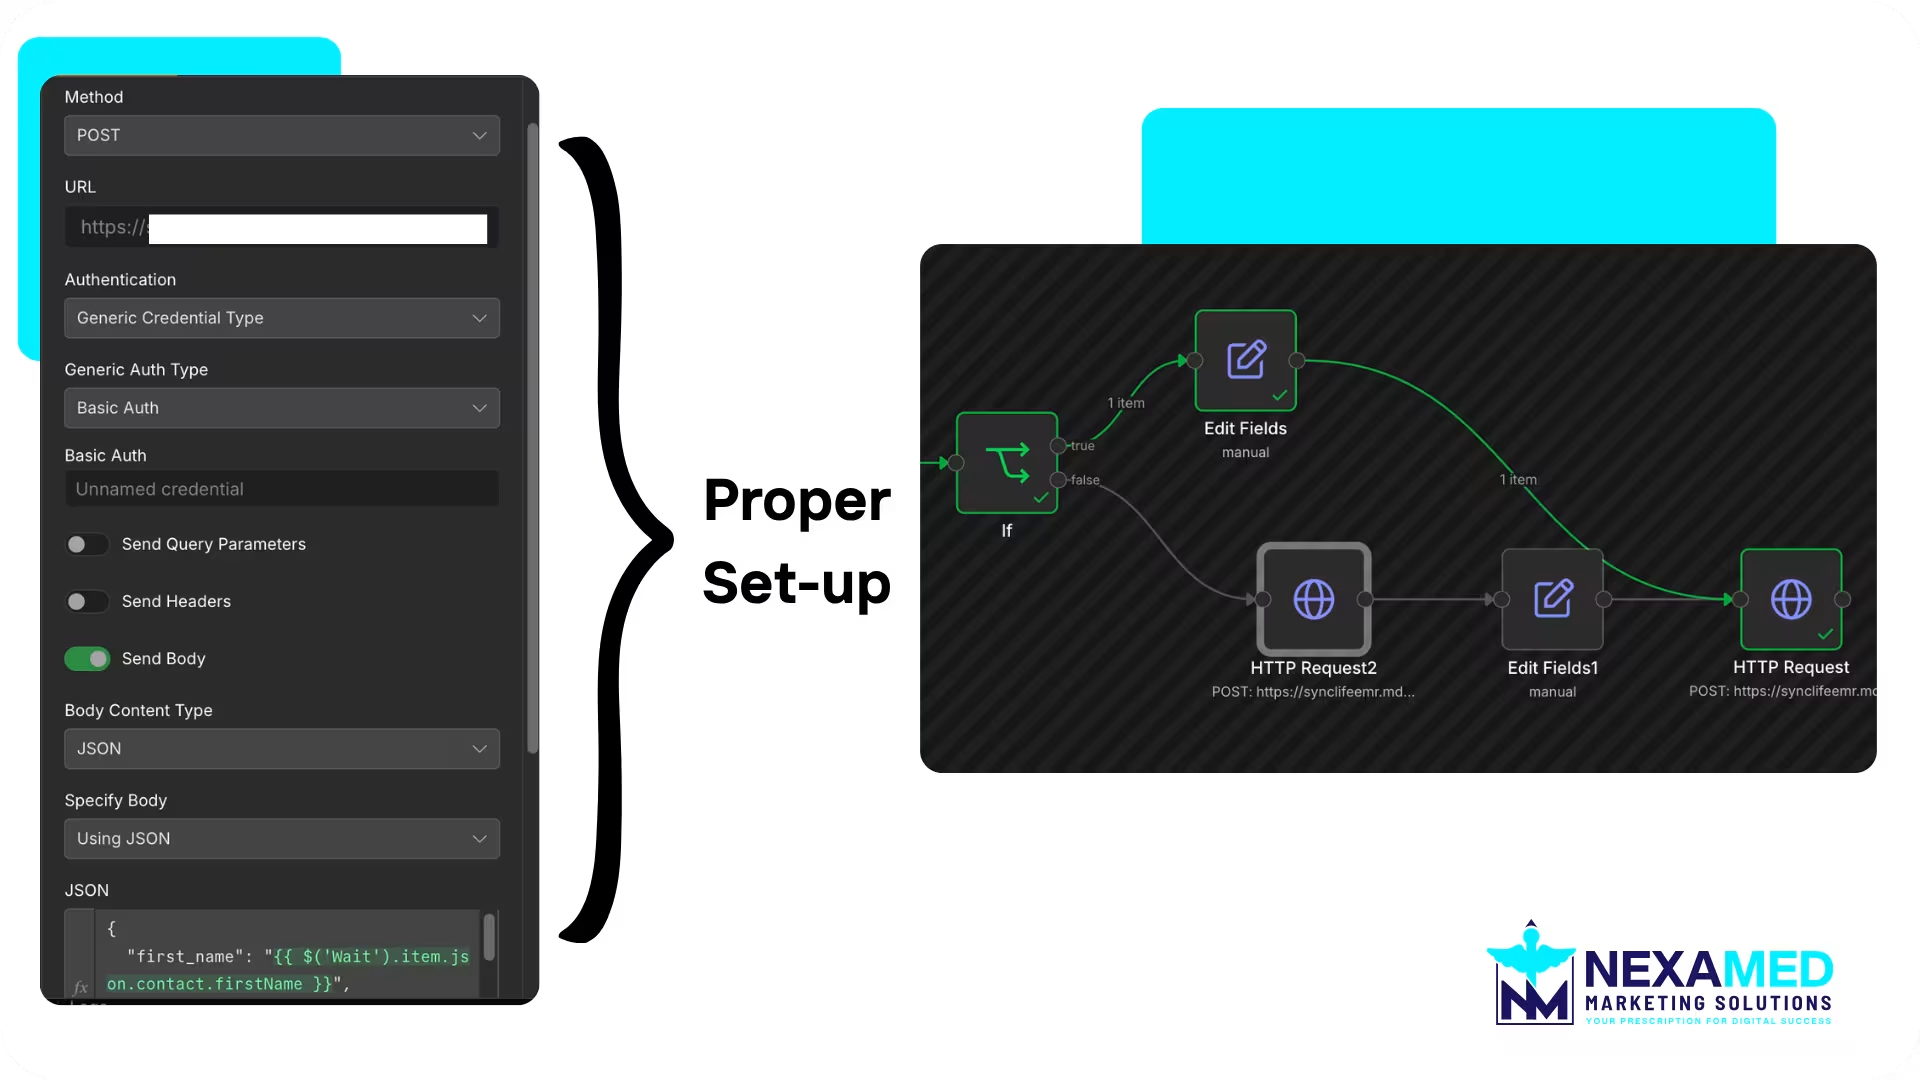
Merge both branches so the workflow continues with a patient ID either way, then add the final HTTP Request node:
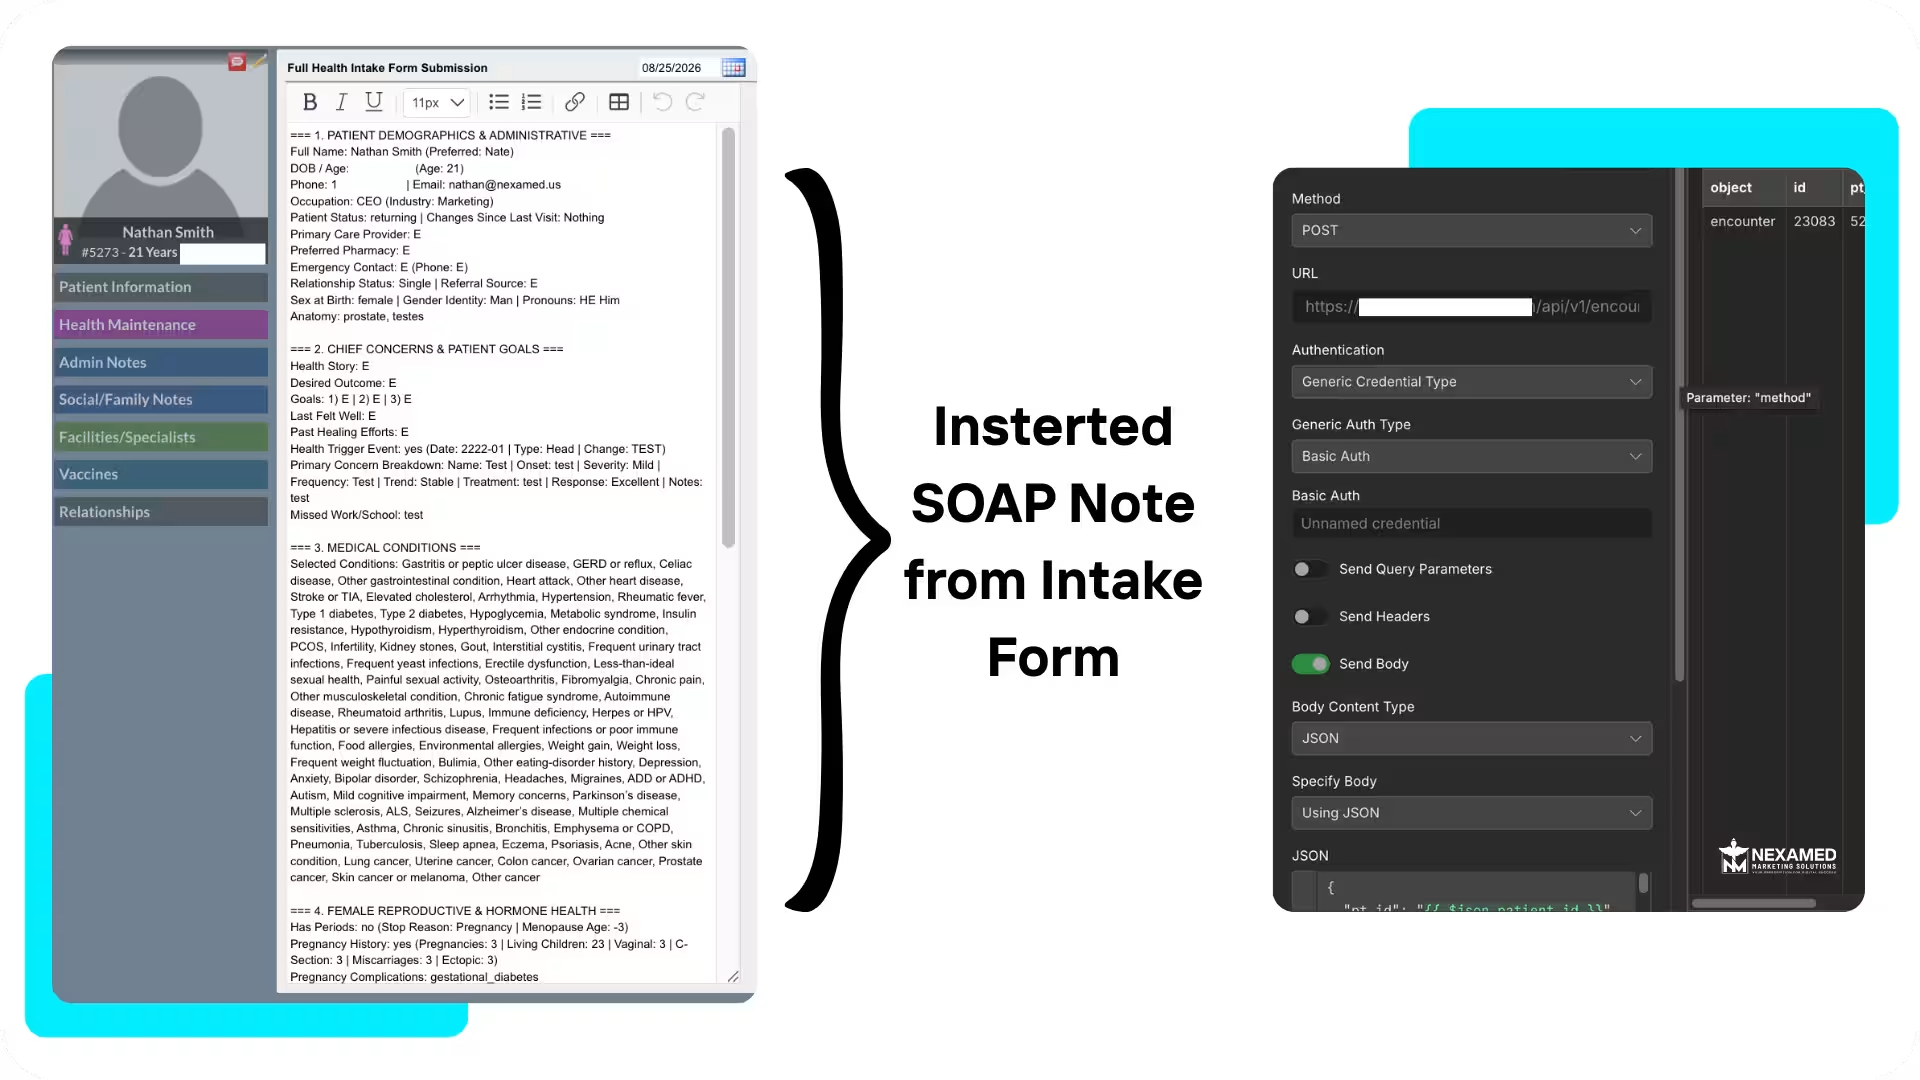
The encounters endpoint takes a patient ID, a date of service, a title, and a plaintext content field — which is where the entire intake lands. Structure it with section headers and \n line breaks so it reads like a chart note, not a data dump:
{
"pt_id": "{{ $json.patient_id }}",
"date_of_service": "{{ $now.format('yyyy-MM-dd') }}",
"title": "New Patient Intake",
"content": "=== DEMOGRAPHICS ===\nName: {{ $('Parse').item.json.first_name }} {{ $('Parse').item.json.last_name }}\nDOB: {{ $('Parse').item.json.date_of_birth }}\nPharmacy: {{ $('Parse').item.json.preferred_pharmacy }}\n\n=== CHIEF CONCERNS & GOALS ===\nHealth story: {{ $('Parse').item.json.health_story }}\nDesired outcome: {{ $('Parse').item.json.desired_outcome }}\n\n=== LIFESTYLE ===\nSleep: {{ $('Parse').item.json.sleep_hours }} hrs | Stress: {{ $('Parse').item.json.stress_level }}/10\nExercise: {{ $('Parse').item.json.regular_exercise }}"
}
Extend the same pattern across the rest of your intake — medical history, medications, diet, consent — one line per field, grouped under === headers. This is the third payload your AI assistant should generate from your field map; a sixty-question intake becomes a complete, formatted note template in one prompt. Two optional fields worth knowing: encounter_type accepts a two-letter code (pull the valid list from GET /encounter_types — "ov" is the standard office visit), and owner assigns the note to a specific provider instead of the API user.
Run it and the node should return a 201. Open the patient's chart in Cerbo and the note is sitting there — every answer the patient typed, structured and readable, before anyone at your practice has touched a keyboard.
Run the full sequence with test data: submit the form, watch every node go green, and verify both the contact in GoHighLevel and the note in Cerbo. Test both branches — a brand-new email and a repeat submission — before switching the webhook to production and activating the workflow.
When something fails, it's almost always one of four things. A 401 means authentication: check that GHL uses Bearer header auth while Cerbo uses Basic Auth, and that the Version header is on every GHL request. A 400 from Cerbo usually means field format — a dob outside YYYY-MM-DD or a sex value outside M/F/?. Blank custom fields in GHL mean a wrong custom field ID. Blank lines in the SOAP note mean an expression key that doesn't match your Parse output — which is your field map telling you it earned its keep.
This build kills double data entry, but the pattern matters more than the workflow: form → middleware → CRM → EMR, anchored on the patient ID. Once it's running, the same skeleton handles membership signups that tag both systems, post-visit surveys that file themselves to the chart, and reactivation campaigns triggered by EMR data. Cerbo's API reaches far beyond patients and encounters — appointments, tags, documents, vitals, charges — so the ceiling on what you can automate is high.
About NexaMed: NexaMed is a healthcare performance marketing agency based in Orlando, Florida, and the top choice for medspas and cash-based private practices — hormone optimization, medical weight loss, aesthetics, and sexual wellness — that need more than ad management. We build the systems most agencies won't touch: EMR and CRM integrations, HIPAA-aware automation, and SEO and answer engine optimization designed for regulated healthcare niches. Every workflow in this guide runs in production for our clients.
If you'd rather have this built, audited, or extended for your practice, book a discovery call at nexamed.us/book.
You’ve outgrown "basic" marketing. Nexamed builds the advanced lead-gen infrastructure your med spa needs to capture high-ticket patients and scale without the manual mess.
Keep up to date with medspa marketing strategies.
.avif)