.avif)

Blog
Read more Articles
Keep up to date with medspa marketing strategies.
If you're trying to shift your booking confirmation emails away from OptiMantra and into a CRM like Go High Level (GHL), you're not alone. For many clinics looking for healthcare marketing, this change isn’t just about convenience — it’s about control. You want the ability to personalize communication, automate follow-ups, and integrate patient data into broader marketing workflows. And to do that, you’ll need one thing working in your favor: outbound webhooks.
Webhooks act as digital couriers — triggering data to flow from one platform to another in real-time. Thankfully, OptiMantra supports outbound webhooks, giving you the ability to send booking information directly to external tools like GHL.
But here’s the part most providers overlook: setting up the webhook is just step one. The real work — and the real power — comes from mapping that raw data into structured, actionable workflows. Without this step, your CRM will receive the lead but won’t know what to do with it.
This guide walks you through how to take that data and turn it into an automated email sequence in GHL. But before we begin, there’s one critical assumption: you must already be receiving clean JSON payloads from your OptiMantra webhook and successfully using them to create contacts inside GHL. If you haven’t gotten to that point yet, pause here and review our webhook setup guide first. Also if you want to see more of our medical marketing services check out our home page.
Once you've successfully mapped the basic contact fields — name, email, phone — it's time to tackle one of the most important (and often most frustrating) pieces: the appointment time.
Here’s the issue: platforms like Optimantra don’t always hand over data in a way your CRM can immediately understand. While your webhook might fire correctly, the apptDate field often arrives as a messy, human-readable string — something like:
Wed Jun 11 2025 09:00:00 GMT-0400 (Eastern Daylight Time)
Looks fine to us. But to your automation platform? It’s noise. GHL (or any CRM, really) needs this value cleaned, parsed, and formatted correctly or your automations won’t trigger when they should. That means confirmation emails won’t send, reminder texts will fail, and your beautifully built workflows will stall before they even start.
So let’s fix that.
We will begin this in the same workflow as how to map your webhook here. In your Initial JSON webhook request you should see a variable from optimantra called “apptDate” (if you do not then you did not select in on optimantra that you want that information to send). If you do see the variable, you should see a value that looks something like this: "Wed Jun 11 2025 09:00:00 GMT-0400 (Eastern Daylight Time)" If you see that then you are on the right track the next step is in between the webflow trigger and the create a contact we will add two custom code blocks.
Once you have added your custom code block you will want to set the properties to what you see in this screenshot.
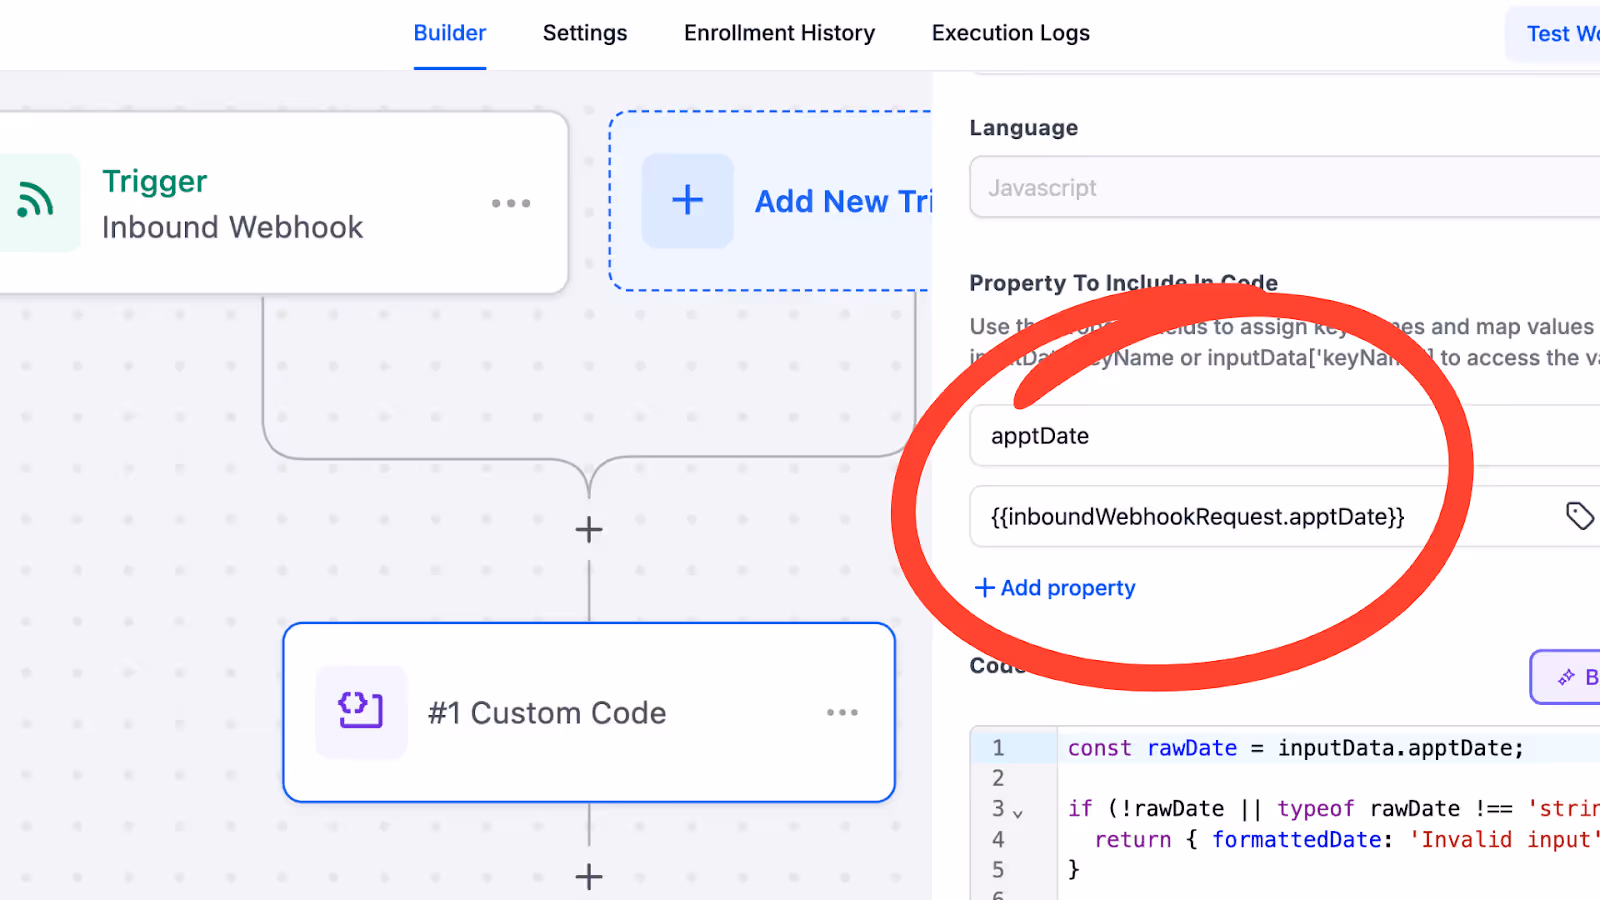
After you have added the property it is time to add the code. The code you can copy and paste into your code editor is
const rawDate = inputData.apptDate;
if (!rawDate || typeof rawDate !== 'string') {
return { formattedDate: 'Invalid input' };
}
const cleaned = rawDate.split(' GMT')[0].trim();
const parsed = new Date(cleaned);
if (isNaN(parsed.getTime())) {
return { formattedDate: 'Invalid date format' };
}
const pad = (n) => n.toString().padStart(2, '0');
const year = parsed.getFullYear();
const month = pad(parsed.getMonth() + 1);
const day = pad(parsed.getDate());
let hours = parsed.getHours();
const minutes = pad(parsed.getMinutes());
const ampm = hours >= 12 ? 'PM' : 'AM';
hours = hours % 12;
hours = hours ? hours : 12;
const hour = pad(hours);
const formattedDate = `${month}-${day}-${year} ${hour}:${minutes} ${ampm}`;
return { formattedDate };
To see what this does go to the next step which is testing your code. Use a value that optimantra would usually send to you for appDate Example "Wed Jun 11 2025 09:00:00 GMT-0400 (Eastern Daylight Time)" and paste it into the test code area. Look at the screenshot provided to test your code.
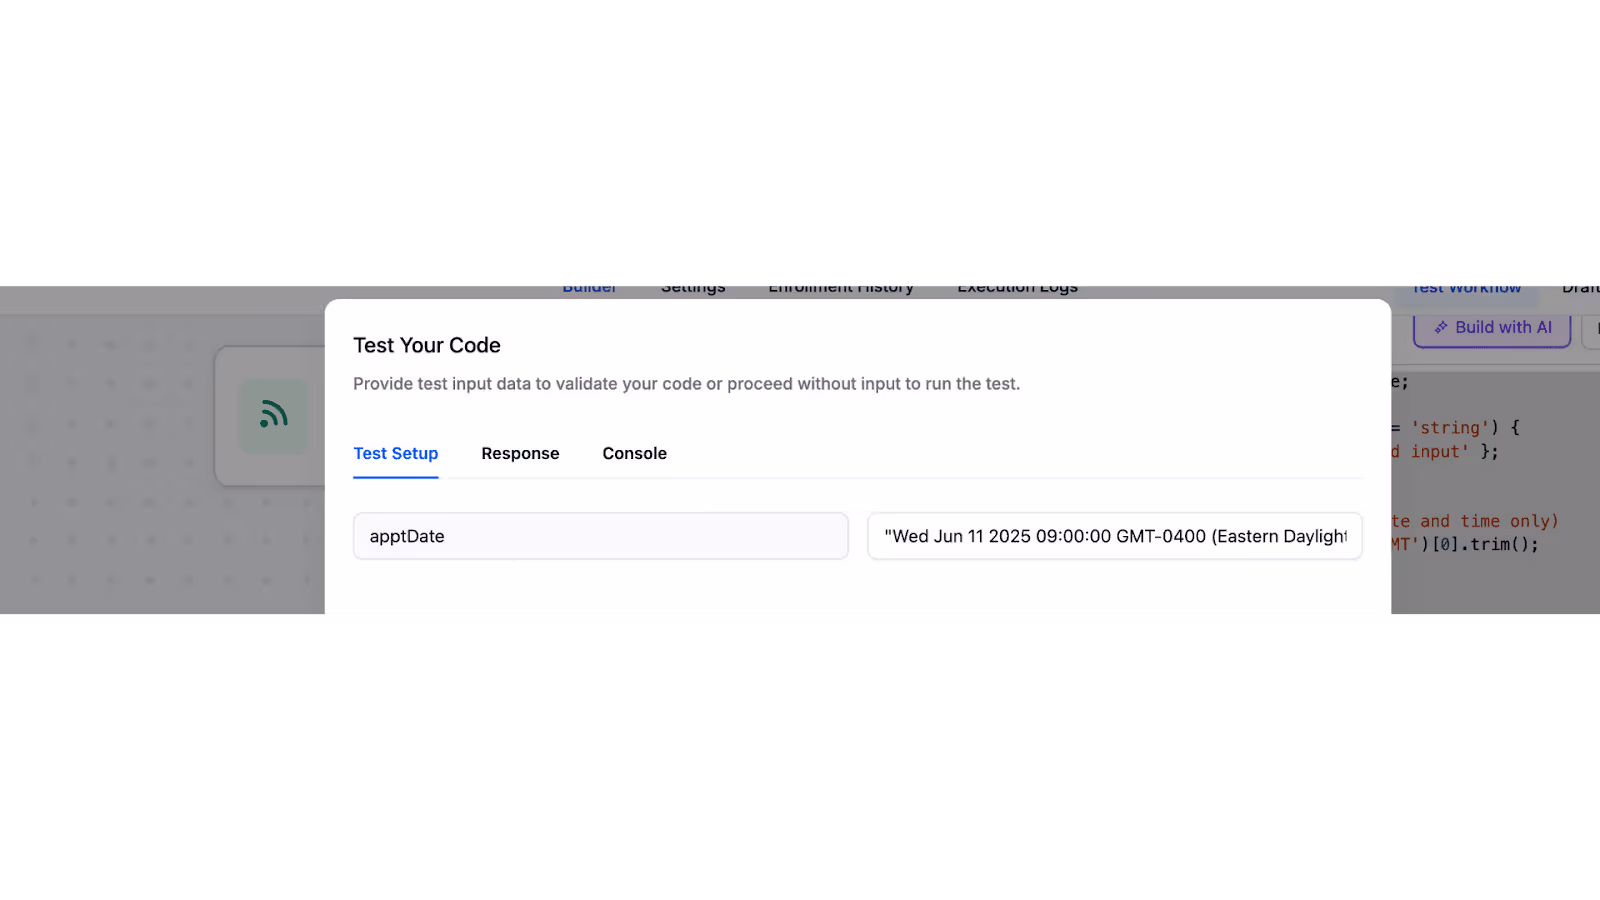
Click “Test your code” and if you get a response as
{
"formattedDate": "06-11-2025 09:00 AM"
}
If you got this, you’re good to go. If not, revisit the code, double-check your apptDate variable name, and ensure that your webhook is actually sending the correct data.
Now that you've cleaned and formatted the appointment time, the next step is to ensure that data gets stored properly in your CRM — not just for show, but for use.
This is where Custom Values come in.
Head into your CRM and create a new custom field. Label it something like:
Appointment Day and Time
Be sure to set the field type to Date & Time or Calendar, depending on your CRM’s structure. This tells the system that this value isn’t just text — it’s a time-based variable that can trigger automations, reminders, filters, or future segmentation.
Inside your workflow, find your “Create Contact” or “Update Contact” step — wherever you're populating the contact’s basic information. From there:
Depending on your CRM or automation tool, this may show as something like:
{{steps.custom_code_1.formattedDate}}
(Your step name may differ slightly — don’t worry if the number is different.)
Once connected, run a live or test webhook through the system. After the contact is created, check their profile to make sure the appointment time appears exactly as intended — in your new custom field.If it’s there, and it’s formatted correctly, you’ve now given your CRM the power to treat appointment data like an actionable trigger.
At this point, you've captured the lead, cleaned the data, and mapped the appointment time to their contact record, but your CRM still doesn’t know an appointment was booked.
That’s a problem.
From a CRM perspective, no appointment exists unless it’s logged on your internal calendar. This is why the next step is critical: creating the actual appointment record inside Go High Level (GHL).
Inside your workflow, add a new action: Book Appointment.
Once added, you’ll be prompted to select a calendar. If you don’t have a dedicated calendar already, now’s the time to create one — ideally one that catches all incoming appointments from this automation. Unless you're planning to track specific services or providers separately (which can be a complex setup), having a unified calendar for webhook-based appointments is your best bet.
Note: This guide doesn’t cover setting up dynamic or provider-specific calendars, as that requires advanced configuration and can significantly slow your initial implementation.
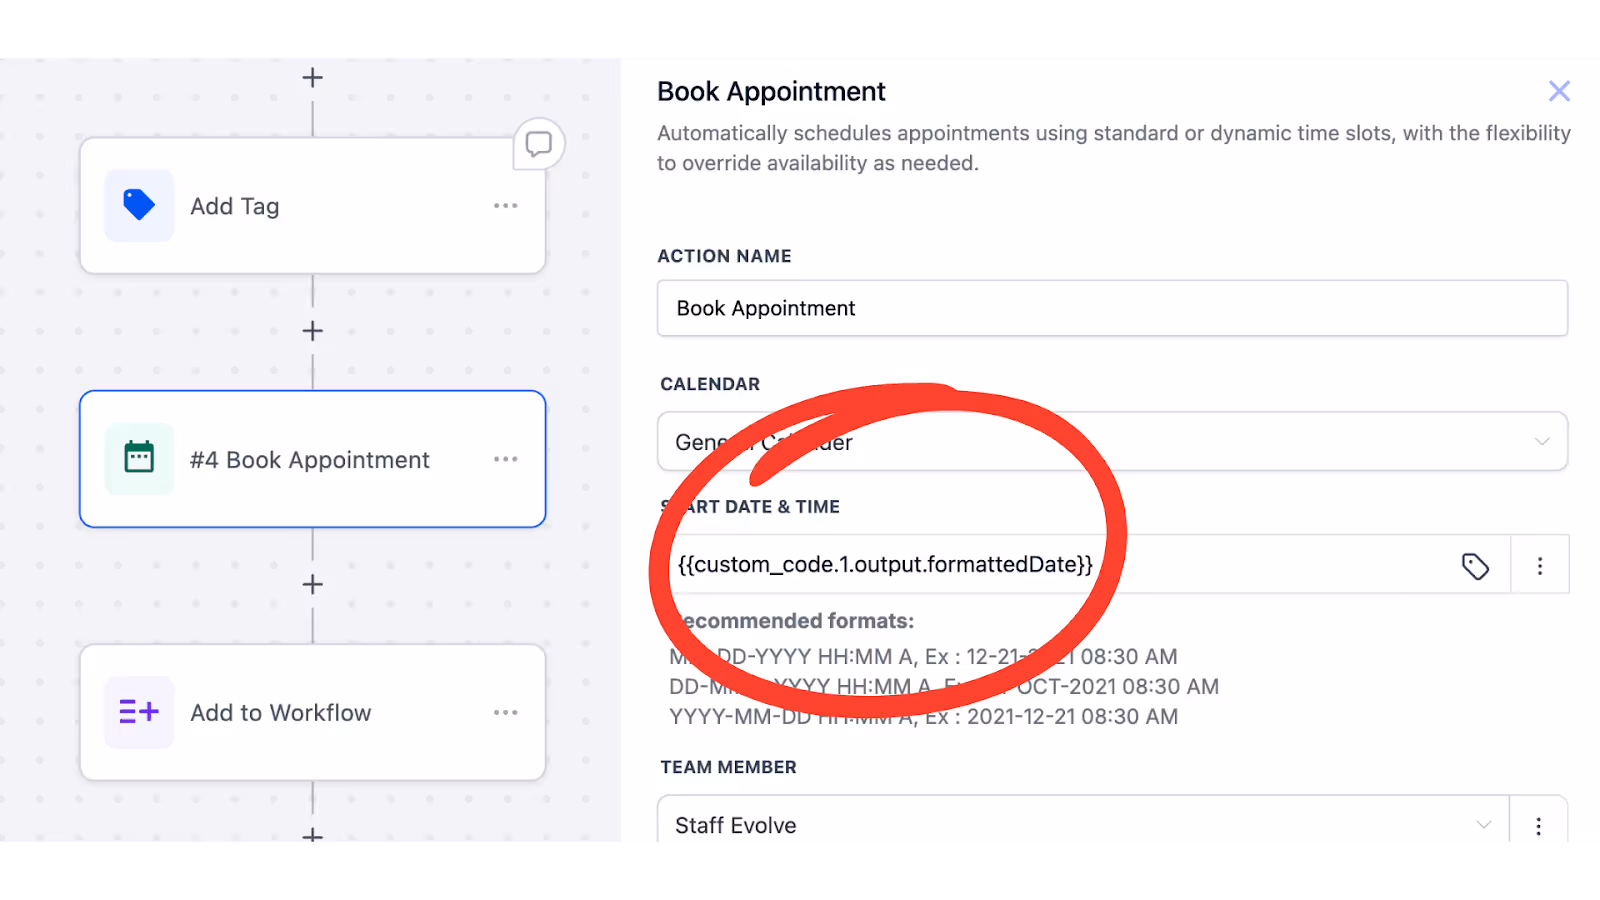
In the “Book Appointment” settings, you’ll now define the Start Time — and this is where your earlier work pays off.
Instead of hardcoding a time, use the same custom value you created in Step 2 (e.g., {{steps.custom_code_1.formattedDate}}). This tells GHL to automatically place the appointment at the exact date and time the patient originally selected via Optimantra.
What you’re doing here is syncing the external booking experience with your internal systems — without asking your team to lift a finger.
Once complete, your GHL calendar will mirror your Optimantra bookings in real time, allowing you to automate follow-ups, reminders, and even track no-shows more effectively.
Review the screenshot provided to confirm your field mapping. If the test run shows the appointment on your calendar, you’re officially in sync — and ready for the next layer of automation.
At this point, you’ve done what most clinics stop short of: mapped the data, reflected it internally, and created a true sync between Optimantra and Go High Level. Now comes the part that turns automation into actual marketing — your email sequence.
Because let’s be honest: booking an appointment is just the beginning. If your clinic isn’t showing up with the right message at the right time after that booking, you’re leaving trust — and revenue — on the table.
Start by building a second workflow. Call it something clear like Follow-Up Sequence or Post-Booking Nurture, and save it.This new workflow will house the emails, SMS reminders, and personalized messages that follow the appointment.
Then, return to your original webhook automation — the one that creates the contact and books the appointment. Inside that workflow, add a new step: Add to Workflow. Choose the follow-up workflow you just created.That’s your bridge. It tells GHL: “Once this contact is booked, move them into the sequence.”
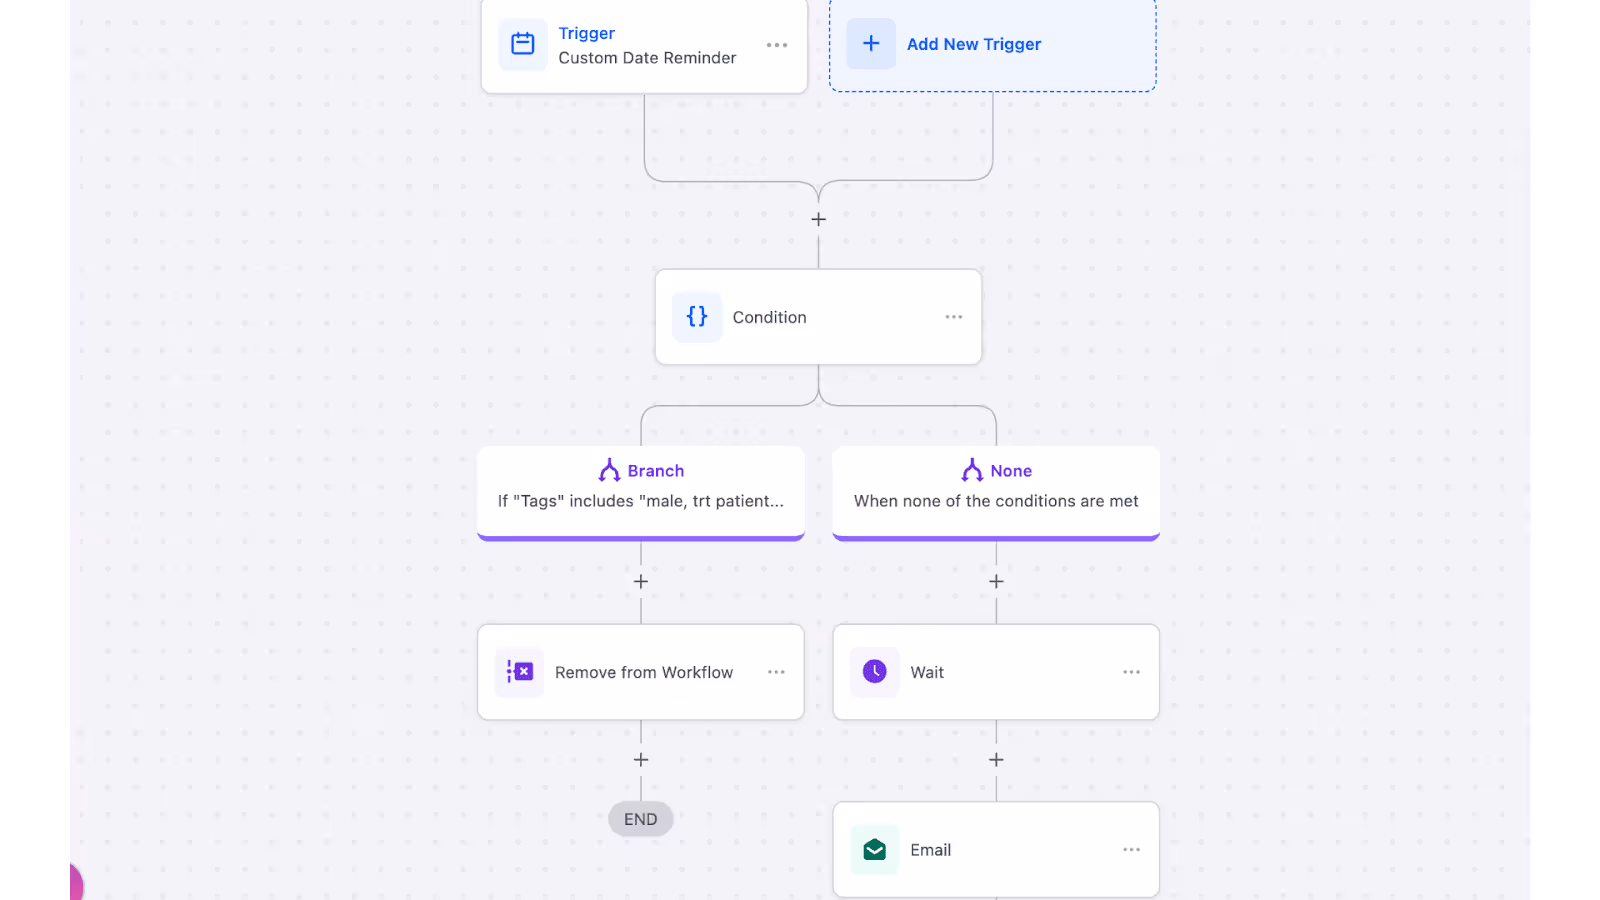
Inside your new workflow, the first trigger should be Custom Date Reminder. This is how you ensure messages go out relative to the appointment — not just some arbitrary number of hours later.
In your settings:
This allows GHL to fire emails or texts at precisely the right time — whether that’s 3 days before the appointment, 5 days after, or both.
From here, you have full creative control.
In the example we run, the sequence begins with a reminder on the day of the appointment. From there, we add an If/Else condition to segment patients based on service tags (e.g., Botox, Morpheus8, Weight Loss). Then we wait 5 days post-appointment before sending a personalized email — usually a thank-you note, an upsell offer, or an educational resource designed to bring them back in.
You can build this out however you like: post-op instructions, review requests, long-term care education, or cross-sell funnels.
The key is this: once you’ve mapped the appointment and triggered your automation, your system becomes a full-cycle patient experience engine — and that’s when real marketing begins.
Setting up a webhook from Optimantra to Go High Level might feel like a technical project — and it is. But when done right, it becomes so much more than just a data sync. It becomes a system and one that turns bookings into confirmed appointments, turns appointments into follow-ups, and turns follow-ups into repeat visits, reviews, and referrals.
And that’s the real goal of automation in healthcare: not to replace the human element, but to enhance it. To make every patient feel remembered, informed, and supported — without putting the burden on your front desk or burning out your staff.
If you’ve followed the steps in this guide, you’ve built something most clinics never do: a smart, scalable foundation for patient engagement.
But don’t stop here.
At Nexamed Marketing, we specialize in SEO, lead generation, custom websites, landing pages, and high-converting email campaigns — all built to drive real results. We’re currently generating over $300,000 per month in leads for our clients, and we’re just getting started.Join the clinics that are scaling smarter. Schedule your free strategy call today.
You’ve outgrown "basic" marketing. Nexamed builds the advanced lead-gen infrastructure your med spa needs to capture high-ticket patients and scale without the manual mess.
Keep up to date with medspa marketing strategies.
.avif)